
In this article I’m going to talk about my approach to the OSCP exam and include the resources I used to help me prepare and pass it. Seems to be very nice article take a read, you’ll love it and learn lots of thing from this OSCP Preparation article
🤝Introduction
Weather You have Your first hackthebox lab of doing your 50th of tryhackme room. You have ever listen about Offensive security penetration testing (OSCP).
It’s trending from past 3-4 year in the Infosec industry and every Penetration tester must do it, In Now days It is also asked by the HR’s in the big tech giants
This exam has earned a reputation as one of the most “intimidating” exams in the industry for several reasons, but for now I’ll focus on three:
- Compilation of advanced practical challenges (6 in total)
- Strict time constraints (24 hours for technical part)
- Premium Price Tag ($1499 for 1 test attempt + 90 days of lab access)
Offensive Security announced earlier this year that they would be changing the test environment to focus more on Active Directory. Read More About here
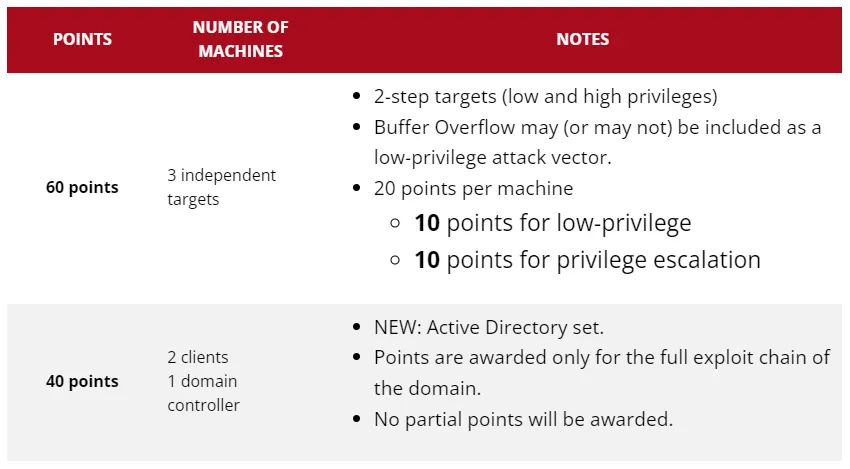
New Structure of The OSCP Exam
- 3 Independent targets (10 for user + 10 for root) = 20 points each
- 1 Active Directory set (2 clients + 1 domain controller) = 40 points
- A Good Looking Report like professionally : (showcasing each of your steps) = 10 points
- Proctored Examination: Yes, you are being monitored and your activity is being monitored.
- To Pass : 70 points needed
- What are the Rules : This must be check .
How you can prepare yourself for OSCP Exam
A bitterish truth is that you can’t fully perpare yourself for this oscp exam, It is fully practical and 24 hours Exam. May be, you have never seen or did before like this.
Note these master points to focus more on mastering your methodology and understand the process :
- Reconnaissance (✔ This Article 📃 : 8 Cool Technique of Recon)
- Scanning & Enumeration
- Exploitation (Gaining Access)
- Privilege Escalation
- Command & Control (Persistence/Maintaining Access)
- Clearing Tracks (usually not necessary in CTF’s, but good practice)
Step 1 & 2 will depending on the environment of the machine in the oscp exam you’ll get.
You can group 1 & 2 in the “Information Gathering“
Thought Process in OSCP Exam – Breakdown

Once Exam Started, You’re given a set number of hosts: 3 standalone environments & 1 AD set (2 clients + 1 Domain Controller). Start Wherever you believe you want.
What to Do – Remember your methodology just like before how’s you approached the Target.
It’s no different than the steps you would take if in a HTB or THM room. If your immediate thought revolved around “Gathering Information/Scanning” — correct! Now, what will your micro-steps (tool usage) be? Here are mine (in no specific order):
I’ll leave tool usage/syntax up to you but I will provide some examples/use cases:
- Just Run Nmap on the host and review that finds. Click here for Network Enumeration tools / examples
- If domain (port 80/443 is open), add it to /etc/hosts — navigate to domain and run nikto scan in parallel to check for possible vulnerabilities.
- Also, run a tool like FFuF or sublist3r to review potential subdomains (these are usually filled with “important” information, login portals, file upload portals, downloadable files, or some sort of link within the source code) Huh). Login credentials). Check out for more web enumeration tools / examples for OSCP or Bugbounty.
2A. If those ports are not open, review other open ports/services for possible initial attack vectors. (Examples include: port 21, 22, 88, 5985, etc.). Here’s how I would think :
- On Port 21 (FTP): Can I login anonymously and download some files? – Here you will be looking for some kind of information disclosure or reverse shell upload opportunity (Review The Cheatsheet).
- Port 22 (SSH): Can I brute force login credentials and host? Have I got an RSA token, username, hash or password that can help me during the calculation process? What service version do I see connected to this port – is it vulnerable? ( Review The Cheatsheet ) .
- Port 5985 (Remote Management): Ah, this must be a Windows environment, let’s see if I can calculate some credentials and use a tool like EvilWinRM to gain further access. (Review The Cheatsheet)
2B. As far as brute-forcing goes, in addition to some of the common tools mentioned above, there’s one tool in particular that (almost) automated my brute-forcing/enumeration process during the OSCP exam – CrakMapExec (Review the Cheatsheet). If you’re not already familiar with it, review the link to get a better understanding of its purpose.
3. From a web perspective (see OWASP top 10 for clarity), consider this :
- Is there an opportunity for Broken Access Control? Could the URL have been manipulated to give me access to an account/directory I shouldn’t have?
- Any valuable information in the source code ? (That could be surprised).
- Any XSS Vulnerability ?
- Is there any Injection ?
I didn’t experience any XSS, BAC, or Injection situations but it doesn’t hurt to be familiar with them.
I would assume vulnerabilities like these would be present in the OSWE exam .This Guys does a great job of showing what these look like in this video, Check this out here.
Importance of Note Taking in OSCP Exam
No magician. When you have multiple hosts to scan, enumerate, and use, it’s essential that you take notes to understand (and remember) the environment of OSCP Machines.
To make it easier, The rowbot created a template for us. You can use it during your exams and continue to use it during various assignments/assessments – it made everything 10 times easier to digest. Here’s a preview:
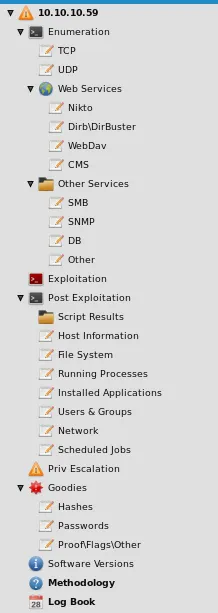
I had a sheet filled with certain tools, methods and syntaxes in case I forgot something. Special thanks to Sanyam Chawla for creating this.
The Reconnaissance + Scanning/Enumeration (Information Gathering) phases are the most important. Use should have been taking notes up to this point and should use them to develop an idea as to what your attack surface is. Allow your findings to lead you directly into your next phase — Exploitation (Initial Access).
What Next After Reconnaissance & Information Gathering On OSCP Machine ?
FIND THE FLAG
4. cd into every directory and cat (if linux)/type (if windows) every .txt file until you find that user flag. From there, you’ll have to copy the flag text and paste it to the corresponding machine shown in the exam portal.
Once the user flag is found, you have completed about 50% of the machine. You will be running adrenaline at this point and you should be motivated to complete the rest of the machine (get root access) – how?
Remember your methodology first of Getting root shell
You are very unlikely to get a shell as the root user. Your next focus should be around the “privilege escalation” phase. It’s safe to say that there’s more than one way to do this. I’ll keep reminding you how you should think below:
Whether one or more of the standalone machines are Windows or Linux, my first order of business was to find my next attack vector.
You can manually enumerate information about the system by looking for additional users, running processes, cron jobs or possibly reviewing old software, looking for kernel exploits etc – but this will take a lot of time.
I automate this “micro-step” by using a tool called WinPEAS (if windows) or LinPEAS (if Linux) — the results can be overwhelming initially.
Use this checklist to give you an idea of what you should be looking for. The results of one of these tools may be mandatory in your path to gaining root privileges. Follow the usage of the equipment and review everything in red.
Also, if it’s not obvious by now, you’ll have to be familiar with transferring files/software to and from the target machine — review this cheatsheet to consider your options
5. Besides fishing for vulnerabilities, you can also try dumping credentials, hashes or tickets using Mimikatz.. Hackersploit does a great job showcasing examples here. In addition, use this cheatsheet to assist you with the syntax. The Mimikatz result (or any credential you get for that matter) can be used/reused for privilege escalation or lateral movement – we’ll touch on this more in the Active Directory section later.
There is more than one way to skin a sheep, but the examples discussed here were applicable to me during my testing. Abusing file permissions, taking advantage of OS or kernel-level vulnerabilities, and a combination of some of the tools mentioned should get you thinking about getting a root user. Easier said than done, but I was able to root only 2/3 of the standalone machines by following the method discussed here.
Now, Rest is very Important in Your OSCP Exam

This will give the felling of relaxation to your mind and body and It will be fell like freshy After the Rest .
I shouldn’t have to say this again, but I will — document and screenshot all of your findings! Not only will you need them for your report, but keeping your artifacts could save you from having to back track — and you want to be as conservative as possible with your time.
After rooting the machine, take rest for “at least” thirty minutes (depending on how much time you have), or even if you find yourself stuck with the same problem for a few hours Get it, you get it. Take a break, clear your mind, then continue.
It took about 5 hours to root the standalone K2. I made a mental note of the points I “technically” scored. Each is standalone (+20 points), given that you’ve compromised the user and the system.
I was at 40 pts + 10pts (assuming my report would be sufficient) which placed me at 50 total. I decided to use this to my advantage and take a nap (my exam started at 11pm EST, yes, I was tired). I knew when I woke up, I would spend the rest of the day focusing on the AD portion of the exam. I napped for about 4.5 hours and began my exam again at promptly 8:30 am.
How to Expertise Active Directory For OSCP Exam
Maybe that’s why you’re here. Let’s get right to it.
Where to be Prepare yourself for active directory
In terms of preparation, there’s probably no better way to prepare than going through TCM Security’s Practical Ethical Hacking Course (watch the first 12 hours free)and, if you’re ready, to actually take the PNPT exam.
The course will not only teach you how to build your own AD environment (which is invaluable), but it will give you better insight on common attack vectors and misconfigurations.
Another great resource is the TryHackMe Offensive Security Path (great especially if you’re a beginner). In addition to the aforementioned resources, Offensive Security includes a decent amount of labs that will walk-through each phase of exploitation, as well as some “Proving Grounds” boxes to practice on.
List of Active Directory’s Tryhackme Rooms :
• https://tryhackme.com/room/attacktivedirectory…
• https://tryhackme.com/room/activedirectorybasics…
• https://tryhackme.com/room/postexploit…
• https://tryhackme.com/room/attackingkerberos…
• https://tryhackme.com/room/zer0logon
• https://tryhackme.com/room/vulnnetroasted…
• https://tryhackme.com/room/enterprise
• https://tryhackme.com/room/adenumeration…
• https://tryhackme.com/room/exploitingad
Hackthebox Machine to Practice Active Directory for OSCP Exam.
Take a look here : 👇
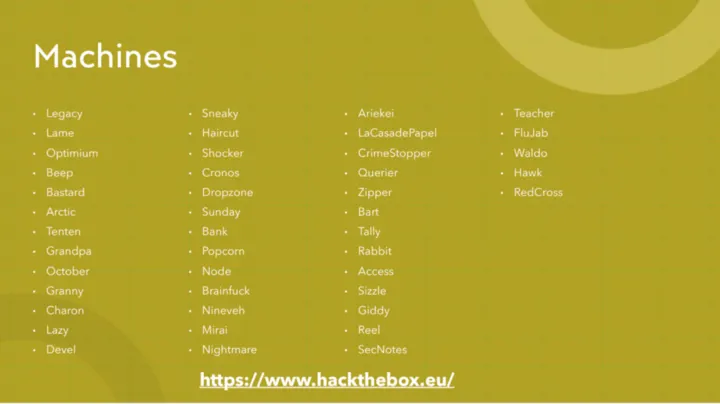
Active Directory Exam Structure in OSCP
2 Clients + 1 Domain controller. This portion is worth 40 pts.
Active Directory Approach
To preserve the integrity of the exam, I won’t go into detail about where you “start”, but I will say this – the standard “methodology” and “micro-steps” you would implement in a standalone environment, Unless it’s time to enumerate the environment and move/remove privileges afterwards:
- BloodHound: Displays visual of AD environment
- CrackMapExec: Do Some Research
- Impacket: Great for abusing Windows Network Protocols
- LinPEAS: Displays Lin Priv Esc Vectors
- WinPEAS: Displays Windows Priv Esc Vectors
- PowerView: Allows for enumeration of an AD environment
- PowerUp: Displays Windows Priv Esc Vectors based on system
- misconfigs Mimikatz: Credential Stealer
- Chisel/SSHuttle: Port Forwarding (pivoting)
- Any hash cracker: Self Explanatory
These will be your best friends when using Active Directory.
Assuming you’ve successfully gained a foot-hold into the environment, one of the first thing you’ll want to do is get a better understanding of what your escalation path would be.
The tool that comes to mind for me is none other than BloodHound (HackerSploit does a great job of showcasing BloodHound capabilities in this video).
Once you have your “path” in mind, it’s time to think of ways to move — remember your “micro-steps” from earlier. Check for accounts, file permissions, and running services to see if they have some value (you could potentially automate this with a tools like PowerView & PowerUp). If you are unable to download files and your automated approach doesn’t work, spin up power-shell and begin your enumeration manually.
Here’s your cheatsheet. If you still need some assistance, watch Joe Helle enumerate AD like he created it.
Conclusion :
- How can you “master” the methodology? Just Practice!
Some of you might have just passed the eCPPT, CRTO, PNPT, eJPT, CRTP/E, solved a bunch of HTB/THM Rooms or even competed in CTF’s — that’s practice! You can never practice “too much”.
If you made it this far, I’d like to thank you for your time. This is my second article and my only wish is to help more people in this space. Again, the purpose of this article was to familiarize (or remind) people of how important the basics are. Often times we feel “lost” (I still do), and it could be discouraging seeing everyone else “master” a concept or acquire a certification — especially as “important” as the OSCP.
Check out The One more Article that could make perfect the way of your reconnaissance here .
Thanks 🙏 To All For Reading this Article
All The Credit Goes to : 0xp
- Twitter: https://twitter.com/whoisPremier
- Discord Server: https://discord.gg/5q5PmCRmBA